
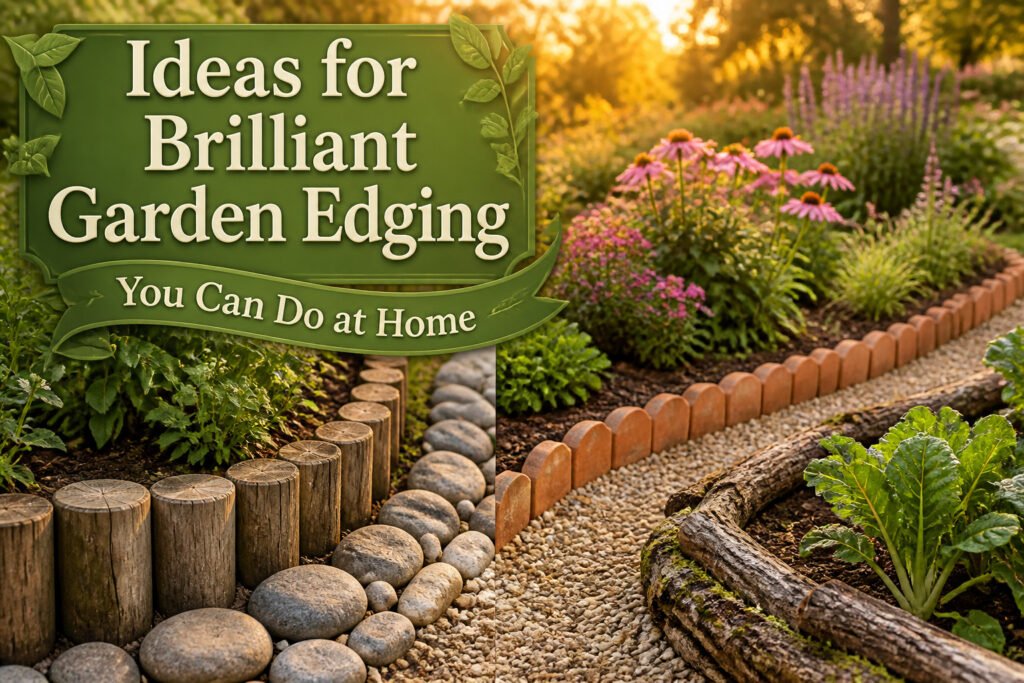
Garden edging runs from free log rounds to $20 per linear foot for poured concrete, and the right choice depends on whether you need a crisp line that disappears or a border that becomes the feature. The catch is that some materials quietly fail in specific climates: bamboo cracks within two seasons in hard-freeze zones, standard terracotta flakes apart by year three, and even pound-in plastic heaves upward where winters freeze deep. The Memphis Botanic Garden gets around wood rot by using vertical hardwood rounds in flower beds and letting weathered limbs decay into vegetable plot edges, a split approach that costs nothing but accepts replacement.
1. Logs

Log rounds give a garden bed the kind of border that looks like it grew there. Slices of trunk set upright into a shallow trench, about six to eight inches tall, create uneven heights and natural bark texture that suits cottage plantings or anywhere a crisp edge would feel wrong. Fallen trees or a neighbor’s removal job keep the material cost at zero, which matters when the annual garden budget sits around $500–800.
Hardwoods outlast softwoods, though any untreated wood in soil will rot eventually. Sections need replacing every few years depending on climate and species. Six to eight inches is the working height that stays put without heaving while still showing enough above ground to read as a deliberate edge.
Logs also work laid horizontally, a lower profile that driftswood-like decaying branches can reinforce for vegetable beds. The Memphis Botanic Garden uses both: vertical rounds in flower beds, weathered limbs holding vegetable plot edges as they slowly soften into the soil. Either way, this is a use-what-you-have project, not a purchase.
2. Bricks

Bricks have been a garden edging staple for long enough that calling them a staple already feels tired, but the material keeps earning its place. Laid flat in a shallow sand bed, they give a low, clean line that disappears into the geometry of a cottage garden or a formal bed alike. Tilted on edge or set at a diagonal, the same bricks throw small shadows and read as a low wall rather than a floorboard.
Reclaimed bricks from demolition sites or salvage yards usually cost less than new ones, and their weathered faces suit a garden better than the sharp edges of fresh stock. The installation is straightforward: dig a trench, level a base of sand, and set the bricks close enough that sand fills the gaps. They handle freeze-thaw cycles well and rarely need replacing. For a curved border, bricks are surprisingly forgiving; you fan the gaps slightly rather than cutting. The only real choice is whether you want the line to whisper or to speak.
3. Stone

Stone edging carries the weight of looking like it has always been there. A line of fieldstone or river rock pressed into the soil along a bed’s edge will outlast any season you throw at it, and the cost drops to nearly nothing if you can collect what you need from your own yard or a friend’s property. The tradeoff is patience: smaller rounded stones shift underfoot and need resetting after hard rain, while larger, flatter stones stay put with just a firm press into the ground.
Flagstone and stacked rock give you two very different moods from the same material family. A single layer of flagstone laid flat reads clean and almost path-like, especially when it runs beside a walkway. Stacked rocks, whether slate or rougher fieldstone, build a low mini-wall that holds soil back from creeping into lawn or gravel. That raised edge also buys you a few extra inches of planting depth, which matters more than it sounds for bulbs that want good drainage.
The aesthetic appeal here is flexibility rather than perfection. Irregular shapes suit cottage gardens and informal beds where a ruler-straight edge would look out of place. Over time the stone weathers, moss settles into the gaps, and the border settles into the garden rather than sitting on top of it.
4. Bamboo

Bamboo edging carries a contradiction worth naming upfront. The same material praised as sustainable and almost indestructible in sales copy has a way of cracking or graying within two seasons in climates with hard freezes, something the tranquil garden photos never quite show. What convinced me, reading through the guides, was how much depends on whether you are buying actual bamboo or the rolled bamboo-look fencing that pops up first in search results.
The real thing, sold as short fencing you pound directly into the ground, runs about $26 for a starter border and gives that Eastern-inspired structure the photos promise. It does reduce weed growth and cuts down on edge-trimming, which matters if you are already managing a small space on limited time. In dry climates or under cover, bamboo holds up for years; in wet-cold zones, expect to replace it every two to three years even with treatment.
Style is the harder limit. Bamboo reads as tropical or zen, which works beautifully against gravel and hostas but clashes with cottage plantings or formal boxwood. If your garden sits between identities, this is one edging choice that forces the question rather than answering it.
5. Plastic Edging

Pound-in plastic edging is about as close to a no-dig installation as you will find. You lay the strip where you want the border, drive spikes through the built-in tabs, and the lawn on either side holds it in place. No trenching, no sawing through roots, and a single afternoon covers a whole bed.
The material itself is cheap enough that you can edge a large project without the budget groaning. Flexibility is the other advantage the sources keep coming back to: the same strip bends around a curved bed or snaps straight for a walkway line. Some styles even carry a scalloped profile that reads as more intentional than basic black strip.
Cold-climate gardeners should know the catch. Freeze-thaw cycles can heave the spikes upward over winter, so the edge sits proud of the soil by spring. The fix is just tapping it back in, but that five-minute chore repeats yearly in zones with hard ground freeze. For a renter or a first-season gardener testing whether edging matters to them, that trade is usually worth it.
6. Metal Edging

Metal edging gives the thinnest, most precise line of any material, and once it is pushed into the soil along a trench line, it all but disappears. That near-invisibility makes it worth considering when you want clean separation between lawn and bed without the edging itself becoming the feature. Steel and aluminum are the common options, sold in long strips that bend into smooth curves rigid materials like brick or timber struggle to achieve. Steel will develop a rust patina over time, which reads as attractive in a naturalistic garden; aluminum stays bright but is lighter and more prone to shifting in loose soil.
For a more deliberate statement, Corten steel edging carries a weather-resistant, rust-like finish meant to look aged from day one. It suits modern or Southwestern palettes, can be bent into curves, and asks little once installed. The tradeoff is weight and cost against aluminum, and whether you want the edge to whisper or to speak.
7. Wine Bottles

A row of upturned wine bottles neck-down in the soil catches morning light like scattered stained glass. The technique is simple: push each bottle upside down far enough that the neck anchors firmly and the shoulder sits flush with or just above ground level. Stability matters more than depth; a line that leans after the first hard rain defeats the whole purpose.
Sorting by color turns the practical into the deliberate. All greens, all ambers, or a strict alternating pattern each read as intentional rather than accumulated. The glass itself is the ornament, so labels should come off clean. A soak in warm water and a scrub with steel wool usually does it, though some adhesives need a second pass.
This is edging for the patient collector, not the weekend planner. A forty-bottle border represents something like two cases of wine, and rushing to empty bottles for a project misses the point. The charm lives in the gradual accumulation, the visible evidence of evenings that already happened. Durability is the open question: frost heave, errant lawnmower tires, and the eventual brittleness of weathered glass all wait for their season. For the moment, though, the light through colored glass at the garden’s edge is difficult to replicate with anything else.
8. Seashells

Seashells carry a coastal charm that few other edging materials can match, and they remain one of the less common choices you’ll see in inland neighborhoods. Large clamshells or whelks create a striking contrast against grass and leafy greenery, their pale curves catching light in a way stone never quite manages. The effect shifts entirely if you crush them; the fragments read closer to a pale gravel or rock garden surface, losing the sculptural quality but gaining a softer, more integrated border.
Sourcing shapes most of the practical decisions here. Beachcombed shells from your own collecting work beautifully if you live near the coast, though gathering enough for a full bed edge takes patience. Buying shells in quantity is possible through garden suppliers and craft retailers, though costs climb fast for larger species. Bury each shell roughly 6–8 inches deep to keep the row stable through freeze cycles and the occasional bump from a lawnmower; shallower settings tend to heave and scatter. Backfilling with soil around each shell, rather than simply pressing them into turf, locks them in place noticeably better.
The theme fit matters more than with most edging options. Seashells look deliberate near a cottage garden or a patio with weathered wood; in a formal bed of clipped boxwood, they can feel like a costume piece that wandered in from another yard. That specificity is both the appeal and the limit.
9. Mulch

A mulch border gives you the softest transition between lawn and bed, but the catch is that mulch needs its own containment to stay put. Wood chip mulch is the cheapest route. It suppresses weeds, holds soil moisture, and creates that natural, informal edge that works especially well in relaxed garden styles. The trade-off comes fast: mulch breaks down and needs topping up once or twice a year, and without a physical barrier underneath, grass creeps right through it. One practical fix is pairing the mulch with a shallow trench cut along the lawn side. You keep the visual softness above ground while gaining a defined separation below the surface.
The right garden border adds structure and keeps things tidy.
For a small yard where hard edging feels too rigid, this pairing of mulch plus trench often wins.
10. Pavers

Pavers solve multiple problems at once, which is why they stay at the top of my list for small yards where every inch earns its keep. Scalloped pavers are the standard choice for edging, but flipping them upside down gives a flat, straight top that reads as more modern and sits cleaner against mower wheels. Set them in a shallow trench over a sand base, the same method you’d use for brick, and their weight does the rest: no mortar needed, no shifting after the first rain.
Half-buried placement keeps the visual line low and lets you run the mower deck right over the edge, eliminating string trimmer work entirely. Surface placement, raised an inch or two above grade, creates a stronger physical barrier against mulch migration and grass creep but demands that you edge the lawn side with a blade. I’ve used pavers both ways. The buried approach wins for paths where the paver is the edging; the raised approach works better when the paver is the main walk and the edging function is secondary. Either way, color matters more than people expect. Match your existing hardscape and the border disappears into the whole; contrast it and the line becomes the point.
11. Railroad Ties

Railroad ties split a yard with a weight nothing else matches. The creosote-treated ones carry the familiar smell of old rail yards and a real health question: the same tarry preservative that keeps them from rotting leaches into soil and can migrate into vegetables. For a bed that will grow food, untreated ties or alternatives are the safer call, though plenty of gardeners still use reclaimed creosote ties for purely ornamental borders and accept the tradeoff.
Sources run three ways. Reclaimed ties from salvage yards or rail depots sometimes surface for free or close to it, creosote and all. New landscape timbers, pressure-treated with less contentious preservatives, come stacked at hardware stores and lumber yards for a step up in cost. The third route is the untreated cedar or black locust ties some specialty yards stock; they cost more and weather faster, but they spare you the chemical question entirely.
Laid flat, a tie buries only its own thickness and keeps grass at bay with sheer mass. Stacked two high and pinned through with rebar, they become raised bed walls that will outlast the soil inside them. The work is not delicate: a saw with a carbide blade, a drill for spikes, and a willingness to wrestle two-hundred-pound rectangles into line. Leveling the ground first matters more than with lighter edging; gaps under a tie only grow as it settles.
12. Concrete

Poured concrete gives you the cleanest line between garden and yard, and it survives decades of whatever your climate throws at it. I like the poured option for organic curves, especially where a gravel path meets a bed; the concrete defines the two spaces without looking fussy. If you want something softer, scalloped concrete edging runs in precast sections that slot together, though flipping those scallops upside down for a flat top reads more modern, at least to my eye.
For home pours, a simple board mold works for straight runs, while flexible plastic or rubber forms bend for curves. Curing time is the part that tests patience: concrete needs roughly 24 to 48 hours before you can strip forms, and full strength takes about 28 days. Landscape curbing runs $15 to $20 per linear foot installed, more if you raise it into a retaining wall. That price stings next to pavers you can set yourself, but poured concrete never shifts or heaves once it sets, and you will not reset it in five years.
13. Gravel

Gravel is the cheapest edge you can lay down, and the honesty of that price is that it only works if you hold it in place. A shallow trench about four inches deep gives you the pocket; line it with a weed barrier pinned at the edges, fill with pea gravel or river rock, and rake level. Without the barrier, weeds push through inside a season and the maintenance doubles.
The material can play two roles. Contained inside plastic edging or a row of larger stones, it forms a soft bed border. Left bare against lawn or pavement, the gravel strip itself becomes the edge, and the clean break doubles as a mowing strip. I like the second option for flat ground where water already drains well; on a slope or a clay pocket, plastic grids underneath add stability and let water move through instead of pooling. Two ways to play this: keep the gravel loose for a casual look, or frame it with stone for structure. The stone wins if your dog or your boots kick the loose stuff around.
14. Living Plants

A living border of mixed plantings softens the line between lawn and bed more naturally than any hard material can. Low-growing, compact plants do the visual work of defining the edge while adding color and texture that brick or stone simply cannot match. For a formal look, boxwood keeps a crisp line with seasonal pruning; hostas handle shade where lavender brings fragrance and that English-cottage feel. Clumping grasses like Liriope or Japanese sweet flag give a softer, more modern edge, and a single division can fill out beautifully across a few seasons.
The tradeoff is patience. A planted edge takes longer to establish than installing stone or timber, since those small starts need time to knit together. It also will not stop grass from creeping the way a physical barrier does, so it works best along an existing path rather than right up against turf. Maintenance means trimming and occasional replacement of plants that fail. Once mature, though, a mixed border of perennials, shrubs, and ornamental grasses becomes a garden feature in its own right, with year-round interest that no installed edging can replicate.
15. Recycled Materials

Broken concrete from old sidewalks and patios, called urbanite, costs nothing if you ask a construction crew before they haul it to the dump. I stacked some behind my shed last spring; the chunks weighed enough that two hands per piece was the only way, but the irregular edges look more interesting than factory-cut stone once you settle them in. Old plates work too, pressed halfway into the soil rim-to-rim for a border that catches morning light. Recycled rubber edging runs about $78 for a kit and bends easily around curves, though it suits wood-chip paths better than lawn edges since the black line reads utilitarian up close. What convinced me, reading through a dozen of these writeups, is that recycled materials reward the extra phone calls and lifting. The matching set looks you get from store-bought edging never quite arrives anyway, and the mismatched concrete or buried bottles tell a better story for the effort.
16. Decorative Fences

Small decorative fences do the work of edging while reading as garden ornament. A mini wooden fence, set at bed height rather than eye level, separates one planting area from lawn or path without the visual weight of perimeter fencing. The flowers you set against it gain a backdrop, and the space reads as intentional rather than accidental.
Material choice shapes both look and lifespan. Cedar shingles or shake panels hammer in quickly and weather to silver-gray, though string trimmers chew them up and a mower blade will split them after a season or two. Woven willow brings a looser, rustic line and stretches to fit curved beds; it doubles as support for climbers if you position it where morning glories or sweet peas can reach it.
Height is the practical variable. Keep the fence below roughly eight inches if you need to step over it with a wheelbarrow or mower, or let it rise to knee height where the point is framing a view rather than trimming a edge. Either way, pair the fence with mulch or stone inside the bed to suppress the grass that will otherwise creep through the gaps.
17. Rubber Edging

Rubber edging bends around curves that would crack concrete or fight straight timber, and it holds up through the freeze-thaw cycles that split lesser materials. Most of what you will find is recycled rubber, ground from old tires and reformed into strips or rolls. The surface carries a faint, pebbled texture and a deep charcoal color that does not pretend to be stone or wood. It simply disappears into the bed line, which some gardeners prefer and others find dull.
Installation runs easier than it looks. Pegs tap straight through preformed slots, and the flexibility lets you ease it around an existing tree or a corner you misjudged by a foot. A mower deck can ride right up to the lip, so you skip the string trimmer work that eats up Saturday mornings. The tradeoff is longevity against appearance. Rubber does not rot or rust, but the color fades to a softer gray after a few seasons of sun, and the material can look industrial in a cottage-style border. For holding loose mulch or wood chips in place, though, it does the job without the maintenance stack that timber or steel demands.
18. Terracotta Tiles

Terracotta tiles carry the baked-ochre warmth of a Mediterranean courtyard into even a modest yard, and their scale suits narrow beds where a full paver would crowd the planting. I learned the hard way that standard terracotta, the porous low-fired kind, does not survive repeated freeze-thaw cycles intact. In zones with hard winters, the absorbed water expands, flakes the face, and eventually splits the tile; the breakage rate climbs steeply enough that the savings over concrete or porcelain vanish by year three. Fired stoneware or frost-rated terracotta costs more per piece but holds up, and skipping this distinction is the mistake that wastes the whole project.
Setting them at an angle, roughly halfway between vertical and horizontal, gives each tile two points of ground contact and keeps the line from tipping when soil shifts or a hose catches the edge. Drive a short stake behind every third or fourth tile on the lawn side, hidden below the rim, and the row stays put without mortar. The slight tilt also sheds water rather than pooling it at the base, which matters more than it sounds in clay-heavy soil.
19. Corten Steel

Corten steel carries the industrial edge of raw metal while doing something no ordinary steel manages: it rusts on purpose, then stops. That surface layer of oxidation, called a patina, forms a protective skin that locks out deeper corrosion. The result is weather-resistant edging that holds crisp geometric lines through decades of freeze-thaw cycles without the flaking or rot that claims wood and lesser metals.
The look is unmistakably modern, and it pairs as naturally with a Southwestern color palette as it does with a minimalist lawn. Strips arrive pliable enough to bend into gentle curves by hand, which matters because the upfront cost runs higher than aluminum or standard steel. The trade is lifespan: where budget options bow or rust through in a handful of years, corten settles in and stays put.
Installation is manageable for a homeowner with patience. The strips are heavy but not unwieldy, and they stake in place without concrete if the soil is cooperative. Left alone, the patina darkens from bright orange to a weathered umber over the first two seasons. Some gardeners wet the steel deliberately to hurry the shift; others let the rain do the work and enjoy the slow change.
20. Gabion Walls

Gabion walls bring a weight and geometry to garden edging that nothing else matches. Wire cages, typically galvanized steel mesh, are filled with stone to create a solid, three-dimensional barrier. The open grid exposes the rock inside, so the texture becomes the finish. No render, no paint, no hiding the material.
Most garden edging sits four to six inches above soil level. Gabions easily run eighteen inches or higher, and at that height they do more than mark a bed. They hold back soil on a slope, slow water runoff, and give you a level planting surface where there was none before. A wall that tall needs the first course buried six inches for stability, and the stone fill should be angular rather than rounded, lock together under its own weight.
The DIY path is straightforward but physical. Panels of welded mesh fold into rectangular cages; you wire them shut on site, fill by hand or with a loader if the scale demands it. A short run for a raised bed is a weekend project with gloves and patience. The cost piles up in the stone, not the cages. Scavenged rock from a farm clearing or demolition site drops the price dramatically; bagged decorative stone from a yard does not.
21. Hand Edging

A clean V-shaped trench cut with a flat-edged spade or half-moon edger gives the sharpest line between lawn and bed for zero material cost. Cut straight down about four inches along the border, then angle back toward the bed to open a small channel. The look is surprisingly polished, and widening the bed later is as simple as moving the cut.
The tradeoff is upkeep. Grass creeps back in and the edge softens within weeks without a physical barrier, so re-cutting a few times per season keeps the line crisp. Some gardeners find the ritual satisfying; others tire of it fast. If your budget is tight and you do not mind spade work, this is the cheapest professional result you can get.
22. Landscape Timbers

Pressure-treated landscape timbers cost less than milled stone or metal and install with basic tools. Their uniform 4×4 or 6×6 profile means you get straight lines and right-angle corners without the guesswork of natural logs, though curves are essentially impossible without cutting short segments and losing that clean edge.
For anchoring, drill holes and drive rebar or timber spikes through the timbers into the ground below. Two or three per six-foot length keeps the row from heaving in freeze-thaw cycles. The pressure treatment resists rot for years, though if you are edging a vegetable bed, untreated wood is the safer choice around anything you will eat. Whatever sealant or preservative you do use, check that it is rated plant-safe; not all of them are. A weathered, low-profile timber edge reads cottage garden, while a crisp, taller row suits something more modern. The look you want is mostly a question of height and how long you let the graying go.
23. Old Tires

Old tires read as industrial waste until you cut and flip them so the tread faces up, creating a scalloped, almost floral edge that catches the eye before the material registers. Paint the whole tire or leave the rubber bare; both approaches work, though color is what sells the playful look. A tire sidewall painted in a solid, high-gloss exterior enamel will hold up for several seasons, but the painted surface stays slick when wet, so set the tire deep enough that the rim sits at or below soil level and no one steps on the tread thinking it is a step.
Drainage matters more with tires than with most edging because the hollow center traps water. A flipped tire with the tread up leaves the center bowl open; fill it with gravel or leave it open to the soil below so runoff does not pool. Whole tires placed on edge need gaps between them or the row becomes a dam, and soggy beds follow. The rubber itself is impermeable; the gaps are what save you.
24. Glass Edging

Glass bottles can turn a plain bed line into something that catches late-afternoon light and throws it back in small, unexpected flashes. The usual method is simple: bury them neck-down, shoulder-deep in the soil, so the bases stand in a neat row. Beer bottles, wine bottles, anything with a bit of color in the glass. I have seen this done with clear bottles too, but the effect is quieter, and quiet is not why most people choose glass.
The other approach uses chunks of glass set in mortar, more mosaic than fence. This takes longer and costs more in materials, but it will not shift when someone bumps it with a wheelbarrow. Wear gloves that can handle sharp edges either way; broken glass in garden soil is a hazard that outlasts the project by years.
Light is the real payoff here. Morning sun through green glass gives a different glow than amber or cobalt, and the colors change as the bottles get dirty and you clean them, or do not. That variation is part of the point. The bottles will need resetting after hard frosts heave the ground, and mortar-set glass can crack if water gets behind it and freezes. Neither method is low-maintenance, but both are cheap if the bottles are coming from your own recycling pile.
25. Woven Willow

Woven willow edging, also called wattle, carries a particular English-garden mood that translates well to American backyards without feeling fussy. The technique is straightforward: hammer in upright posts every few feet, then weave flexible willow rods between them in an over-under pattern. You can work with living willow that roots and greens out, or dried rods that stay brown and structural. Living wattle softens into a green hedge line over a season; dried gives you the woven texture immediately but stays static.
The tradeoff is durability. Willow twigs take damage from string trimmers and weather, so this is edging you replace rather than maintain. Expect a three- to five-year life for dried material in most climates, less if your weedeater grazes it regularly. On cost, ready-made expandable panels run around $128 from design-oriented retailers, though sourcing willow locally and weaving your own drops that price significantly. The panels do double duty as supports for light climbers like sweet peas or clematis if you set them slightly proud of the bed edge.
26. Cedar Edging

Cedar splits cleanly into thin boards that bend to curves without splintering, which makes it one of the more forgiving woods for a first edging project. The heartwood contains natural oils that repel moisture and the fungi that rot other species, so it lasts in ground contact without the chemical treatment that leaves pressure-treated lumber smelling like a hardware store and leaching into the soil. That rot resistance comes at a price: cedar runs higher than treated pine or fir, sometimes double the board-foot cost depending on your region and the grade. For a small bed or a single border, the difference might be thirty or forty dollars. Spread across a whole yard, it adds up fast. Two ways to play this: buy cedar for the beds where you handle the soil most often, especially any vegetable patch, and use cheaper treated wood for the foundation plantings against the house where you rarely dig. The cedar wins if you are trying to keep chemicals out of your compost and your hands.
What Edging Actually Does

Edging is the frame most people skip, then wonder why the garden never looks finished. A bed of black-eyed Susans can thrive all season and still read as a lawn accident without something holding its shape.
The practical case is what sold me once I stopped to add it up. A physical barrier cuts weeding time sharply by stopping grass and weed rhizomes from marching into loose soil. After a heavy rain, it keeps mulch from washing onto the sidewalk or patio. Mowing and trimming run faster too: the line is already there, so you are not guessing where the blade should stop.
Curb appeal is the part neighbors notice. Clean edges guide the eye and signal that someone tends this space deliberately. The look can read modern, cottage, or rustic depending on material, but the underlying message is the same: boundaries exist here.
Cost runs the obvious range. Ornamental grasses or hedges you start from small plants sit at one end; poured concrete curbing at $15 to $20 per linear foot sits at the other. Retaining wall edging runs roughly $5 to $10 per linear foot. Most home gardeners working a small yard land somewhere between, with timber, brick, or steel that they install in an afternoon.
What convinced me, reading through a dozen of these breakdowns, is that edging earns its place less by any single dramatic save than by removing a hundred small frictions. The garden looks tended. The mulch stays put. Saturday morning goes faster. That is worth the afternoon of installation before the planting even starts.
Material Types at a Glance

Natural, synthetic, and recycled materials each handle the job differently, and the choice usually comes down to what you want the edge to do versus what you’re willing to maintain. Wood and stone blend in and age visibly; steel or aluminum disappear into the line of the bed; plastic bends to curves without a saw. Recycled options like bottles or tires cost little upfront but need more fussing to look intentional rather than accidental.
| Natural (wood, stone, logs) | Synthetic (plastic, metal) | Recycled (bottles, tires) | |
|---|---|---|---|
| Upfront cost | Low to moderate | Low (plastic); moderate (metal) | Very low |
| Lifespan | Wood rots; stone outlasts the house | Plastic years; metal decades | Varies by material |
| Best for | Soft, rustic boundaries | Clean, precise lines | Custom, one-off looks |
| Install difficulty | Heavy lifting with stone; simple with logs | Push-in strips; trench for metal | Labor-intensive, no standard method |
Metal hides best once installed, with steel developing a rust patina and aluminum staying bright but lighter in the soil. Plastic wins for curves you can’t cut into stone or timber. Recycled materials trend hard right now, though they take more planning to pull off well; the difference between garden-show clever and curbside pickup is usually spacing and repetition, not the object itself.
Installation Basics

Most edging starts with a trench about as deep as the material is tall, plus a shallow bed of sand or packed soil underneath so water does not pool and tilt the line over one winter. A spade, tape measure, and level are the core tools; the level matters more than people expect, because even half an inch of lean across four feet reads as a mistake once the planting goes in.
For brick, stone, or anything stacked, that trench needs to be wide enough to let you adjust each piece before the soil locks it in. A rubber mallet seats things without cracking them. Pound-in kits, plastic or composite, skip the width but still want the same flat base; the mallet drives stakes or snap locks that hold the shape. The rolls of plastic edging are light but uncooperative in wind, so laying them out in the sun for an hour softens the memory enough that the curve you want does not fight back.
Gloves save knuckles on stone and keep blisters reasonable on mallet work. Read the specific instructions before you cut anything; some systems need stakes at exact intervals, and guessing leaves gaps that frost will open wider.
Cost Realities

Simple plastic or rubber edging is usually the cheapest way to get a clean border down, and that matters when you are working a small space on a tight season budget. I have seen the same no-dig plastic kits at every big-box store for years now, the kind that hammer in with spikes and curve around whatever shape your bed has become. They work. They also lift in freeze-thaw cycles and fade to that particular chalky gray that announces itself across the yard.
Recycled rubber runs a little more but handles temperature swings without cracking, and the flexibility means you can fake a curve that stone would laugh at. Wood costs about the same upfront and holds mulch in place better than either, though you will replace or reseal it every few years. Factor the second purchase into the first decision if you are comparing materials. Stone or composite look expensive at the register and earn it back slowly through decades of not touching them again. For a renter or a gardener still learning what shape the beds will take, that long game may not be the right game.
Frequently Asked Questions
What is the most affordable way to edge a garden?
Plastic or rubber edging is the cheapest upfront, with pound-in plastic strips costing little enough to edge large beds without straining a typical $500–800 annual garden budget. Gravel runs even less if you already own the shovel, though you will need a weed barrier underneath or maintenance doubles inside a season. Reclaimed materials like fallen logs, broken concrete, or collected fieldstone drop the cost to zero, but you pay in labor and patience instead.
Which edging best holds mulch in place?
Wood edging keeps mulch contained reliably, whether laid as horizontal logs or stacked timbers, and it does the job without much spending if you source fallen trees or a neighbor’s removal job. Rubber edging also works well; its flexibility lets you bend it around beds, and a mower deck can ride right to the lip so the barrier stays intact. For a softer look, pair a shallow trench with mulch above ground; the trench blocks grass creep while the surface keeps its informal line.
What kind of landscape edging is the simplest to install?
Pound-in plastic edging is the closest to a no-dig installation you will find: lay the strip, drive spikes through the built-in tabs, and the lawn holds it in place. A single afternoon covers a whole bed, with no trenching or root cutting. The tradeoff in cold climates is yearly maintenance; freeze-thaw cycles can heave the spikes upward, so you tap them back each spring, a five-minute chore that most renters and first-season gardeners accept willingly.