
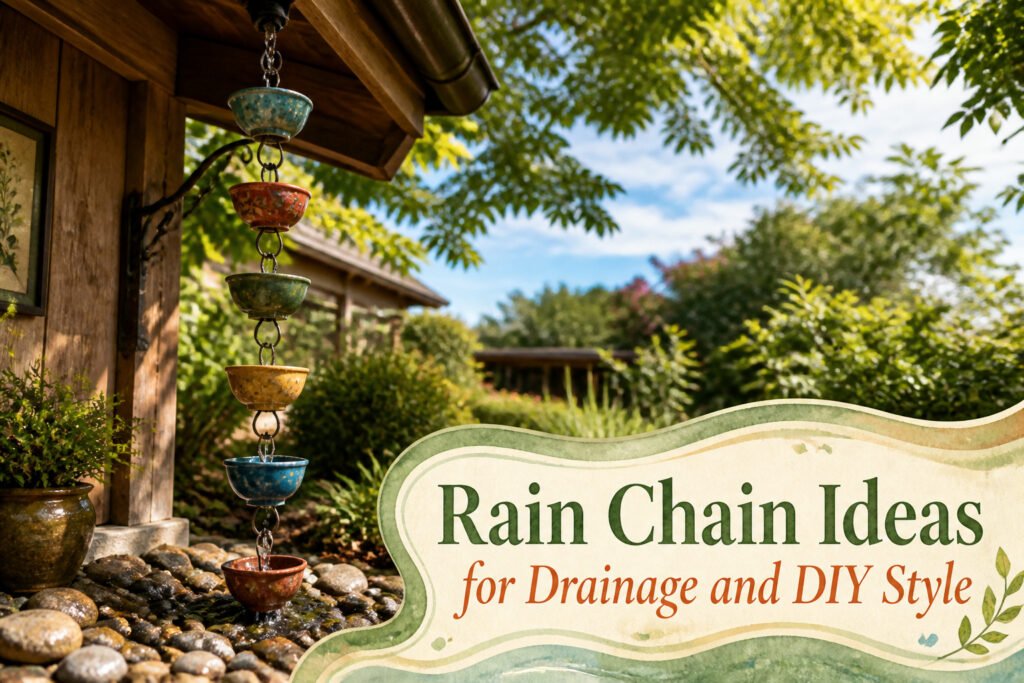
A rain chain idea only works if your drainage plan matches your patience for maintenance. Gravel beds settle and need raking every few seasons; water basins collect mosquitoes unless you empty them; a direct drain-grate connection skips the digging but leaves an industrial fixture in your sight line. The trick is knowing which tradeoff you will actually live with before you hang the first cup. A zinc guttering chain, for instance, needs six inches of overlap between sections or wind sends water straight onto your siding.
1. Gravel Bed with Drainage Pipe

A gravel bed with drainage pipe sits below the chain and guides water into an underground system that carries it well away from the foundation. The gravel layer softens the fall, so you lose the mud splash and scatter that happens when water hits bare soil at speed. It also catches leaves and debris before they slip into the pipe below, which saves you from pulling the whole thing apart to clear a clog.
The catch is the labor. A catch basin connection and proper base preparation push this past a standard install in both time and digging. Gravel beds also settle. Dirt works down between the stones, the surface sinks or shifts, and every few seasons you are out there raking it level and topping it off to keep the look steady. The tradeoff is worth it if the chain sits somewhere the view matters, an entryway or along the front of the house where you want the finish to read as natural ground rather than hardware. But if your chain is tucked behind a hedge where no one walks, the extra work buys you nothing you will notice.
2. Direct Connection to a Drain Grate

The direct-to-grate method is the closest thing to a plug-and-play rain chain install. Water follows the chain straight down through a metal drain grate into whatever drainage your gutter already feeds, no trenching, no dry well, no basin to scrub out season after season. A wire fastener links the bottom of the chain to the grate itself, and that single connection is the whole job. No tools, no digging, no landscape disruption is the selling point, but the tradeoff is real: the grate’s location fixes where the chain hangs, and a rusty or industrial-looking grate is going to stay in your sight line. Splashing stays minimal since the water disappears immediately rather than hitting a surface. For renters or anyone who treats "weekend project" as a warning label, this is the option that gets the look finished before the coffee cools.
3. Gravel Bed with Ground Infiltration

A gravel bed beneath your rain chain lets water soak straight into the ground, no pipe required. You lay gravel under the chain, add weed barrier fabric if your yard tends toward dandelions, and the rain filters down through the stone on its own. The look is quieter than a piped system, more like something that grew there.
The piped gravel bed handles heavier rainfall faster, which matters if your downpour season runs long or your soil leans toward clay. Ground infiltration keeps the spirit of a rain garden, returning water to the soil and easing what hits the storm drains, but puddles can linger when the rain outpaces the soak rate. Mud splashes up more readily too, so the grass right at the edge may need replacing after a wet spring.
For a small yard on a budget, the unpiped version saves the cost of PVC and the half-day of trenching. The tradeoff is performance in a downpour. If your soil drains well and your chain hangs over planting beds rather than a walkway, ground infiltration is the simpler choice. Heavy clay or a walkway directly underneath pushes you toward the pipe.
4. Rainwater Directed Around Plants

A rain chain can do more than look pretty against siding; placed right, it becomes a slow-drip irrigation line for the bed below. The water that slides cup to cup or runs the length of a chain lands in one concentrated spot, so the trick is planning where that spot falls relative to root zones.
I learned this the hard way after installing a simple link chain off a small pergola gutter. The water punched a shallow crater in loose soil and left the surrounding ground dusty. What fixed it was shifting the chain’s anchor point so the stream landed uphill of a young hydrangea, then laying a short fan of river rock at the base to break the fall and let the water spread sideways. The roots got steady moisture without sitting in a puddle, and the rock kept mud from splashing the lower leaves.
Heavy downpours are the risk here. Soil absorbs rainfall at its own pace, and a chain dumping roof runoff in one spot can overwhelm it fast. A gravel collar or a shallow depression planted with irises and ferns, what some call a rain garden, catches the excess and gives it time to sink in. The plants you choose matter: water-lovers handle the surge, while drought-tolerant species drown. Space the chain’s landing zone at least a foot from any stem to avoid rot, and watch the first few storms to see whether you need to widen the rock bed or add a small splash block for dispersal.
5. Water Basin Catch

A water basin at the base of a rain chain turns the runoff into something worth watching. The water pools instead of vanishing, and the surface shifts with each new drop from the chain above. Stone or ceramic basins sit easily in most gardens, though a simple decorative pot or even a terracotta saucer filled with pebbles works if the scale fits. The collected water can go straight to nearby plants, which matters more than it sounds when you are trying to keep a small yard from turning into mud every time it rains.
Still water at the chain’s end also brings a risk that open ground does not. Water held in place needs a plan for overflow and for regular draining, or you are managing mosquitoes and algae instead of enjoying the view. A basin needs to be emptied and cleaned, not just admired. The tradeoff is real: you gain the calm surface and the gentle sound, but you trade the zero-maintenance of a gravel bed for something that asks for attention every few weeks. For some gardens that is worth it; for others, the visual payoff is not worth the standing water.
6. Wine Bottle Rain Chain

Empty wine bottles become something worth watching when light hits them just right during a rainstorm. The glass catches and bends the water into thin sheets, each bottle a small lantern of moving color. This is the kind of rain chain you build from what already sits in the recycling bin, not from a garden-center receipt.
The process is straightforward enough: cut the bottles so the neck of one fits into the base of another, then string them with chain from a hardware shop. The sources split on what happens to the leftovers. One approach uses the bottle tops for the rain chain itself and saves the bottoms for candles. Either way, nothing goes to waste.
Translucent glass will show every water streak and leaf bit, so placement matters. Hang this where afternoon light reaches it but overhanging branches do not. The sound is softer than metal, more of a muted gurgle than a ring. For renters or anyone hesitant to drill, the weight stays light enough that a sturdy gutter hook often handles it without permanent hardware.
The real cost is time and a steady hand with the cutter. Bottles vary, so the chain links take the stress, not the glass edges.
7. Zinc Guttering Rain Chain

Old zinc guttering, the kind with rolled seams and factory-applied galvanizing, makes a rain chain with real staying power. I like the industrial weight of it; each section catches water from the one above and tips it downward in a slow, audible cascade rather than the thin run you get from lighter metals. The zinc develops a matte gray patina in its first season, then settles over years into deeper charcoal streaks where water runs heaviest. That weathering is the appeal, not a flaw to fight.
The material survives freeze-thaw cycles that crack thinner stock. You will want sections with the original downspout crimp still intact, since that cupped end channels water cleanly into the next piece. A friend hung hers with stainless wire through pre-existing mounting holes, no drilling needed. Plan for at least six inches of overlap between sections or wind sends water sideways onto siding.
The look is strictly utilitarian, which suits modern exteriors and weathered clapboard alike. Paint it and you lose the whole point. Let it age, check the wire yearly for corrosion where it meets the zinc, and this outlasts anything store-bought.
8. Metal Spoon Rain Chain
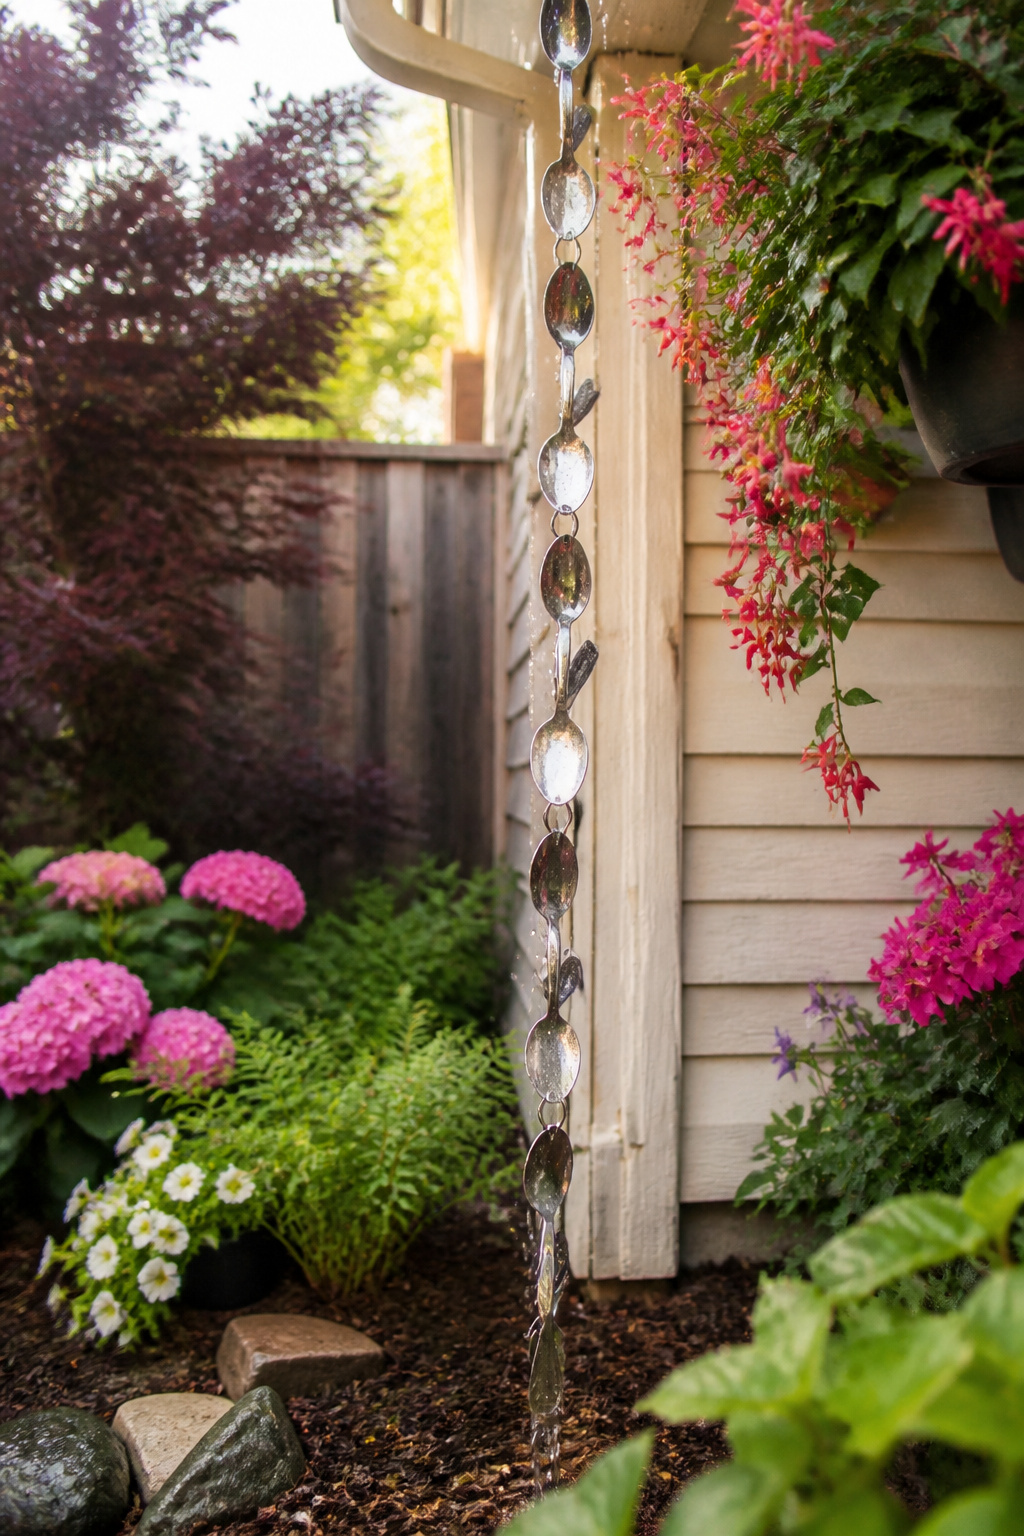
A spoon rain chain made from old silverware turns out sturdier than it looks, and the curved bowls do more than catch the eye. Water hits each spoon and skims along the concave surface, sometimes pooling for a second before tipping over the edge, sometimes running straight through in a thin sheet. That variation is what creates the sound, more of a soft clatter than a drip, different from cup-style chains that thunk and gurgle.
The build is straightforward: drill a hole through each handle, link them with wire rings, and alternate which way the bowls face. One spoon points up to catch the stream from above, the next points down to direct it outward. Over a few seasons the metal develops a patina, that mottled green-gray film that makes the whole thing look like yard art you found at a salvage yard rather than something wired together on a patio table.
What convinced me, reading through a dozen of these builds, is how well the spoons hold up against wind compared to lighter materials. The weight keeps them from swinging into the siding, and the stainless or silverplate most thrift-store sets are made from does not rust through in one winter. The bowls are small, so in a heavy downpour some water will overshoot. Pair this with a gravel bed directly below, or accept that the ground splash zone will be wider than a downspout’s.
9. Terracotta Pot Rain Chain
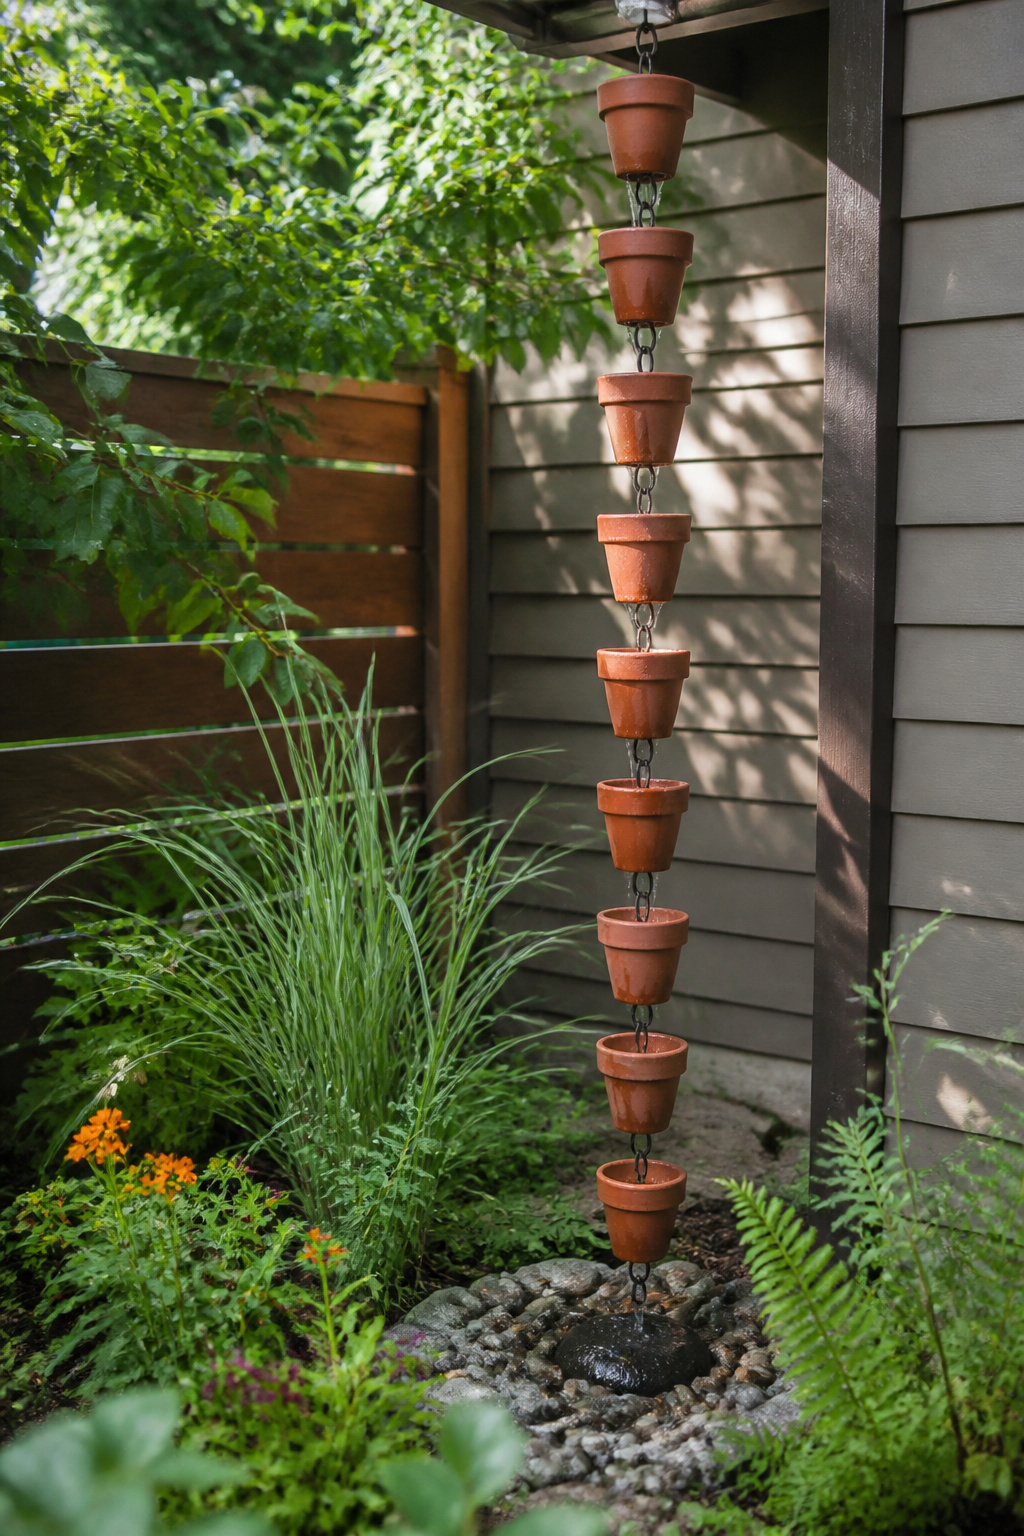
Mini terracotta pots strung along a chain create a gentle, staggered descent that fills and tips at different rates depending on the rainfall. Water spills from the drainage hole of one pot into the next below it, and the porous clay weeps moisture gradually through the walls rather than racing straight to the ground. This slower release is useful if you are routing the chain past shallow-rooted plants that appreciate steady dampness rather than a sudden drenching.
The pots need holes large enough to thread the chain through, which most standard nursery pots already have. If you are buying specifically for this project, check that the hole will accept your chain gauge without binding. Plastic versions are sometimes suggested as a lighter alternative, but terracotta’s weight keeps each pot stable in wind and prevents the whole line from swinging into your siding during a hard downpour. The clay will darken where water passes, developing a natural waterline that shows exactly how the chain performed in the last storm.
10. Boot Water Spout
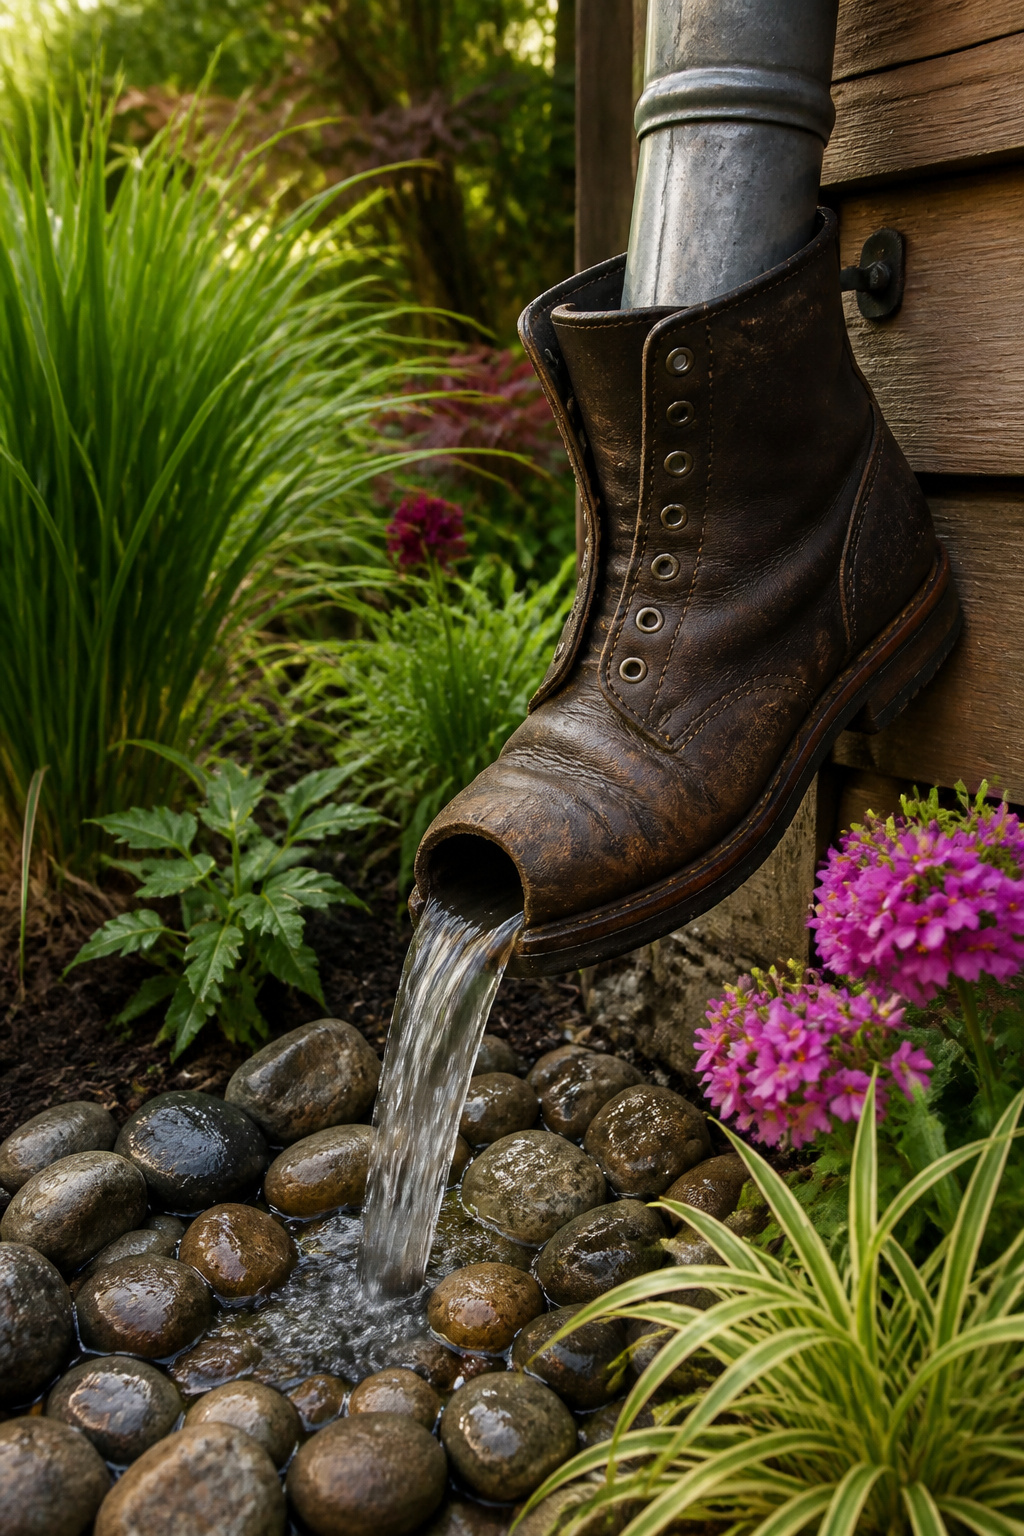
A boot water spout turns a functional problem into the kind of garden moment people actually stop to photograph. The idea, as I understand it, grew from someone needing to redirect water and reaching for whatever was at hand. You cut the toe off an old boot, fit it over the bottom of your downspout or the end of your rain chain, and let the water pour out the opening. The result is whimsical without trying too hard.
The practical half matters more than the charm, though. That boot needs to be secured so it does not shift or blow off in a hard rain. I would wire it to the chain or downspout collar, or strap it with a metal clamp, rather than balance it and hope. Water is heavier than it looks, and a boot full of backed-up rain will pull loose if it is merely resting there.
Plan where the water lands after it exits. The boot spout is only the first move. You still need a drainage bed, a stone catch, or a rain barrel below it. Pooling at the toe of a rain boot is not any better than pooling at the base of a bare downspout.
11. River Rock Rain Chain
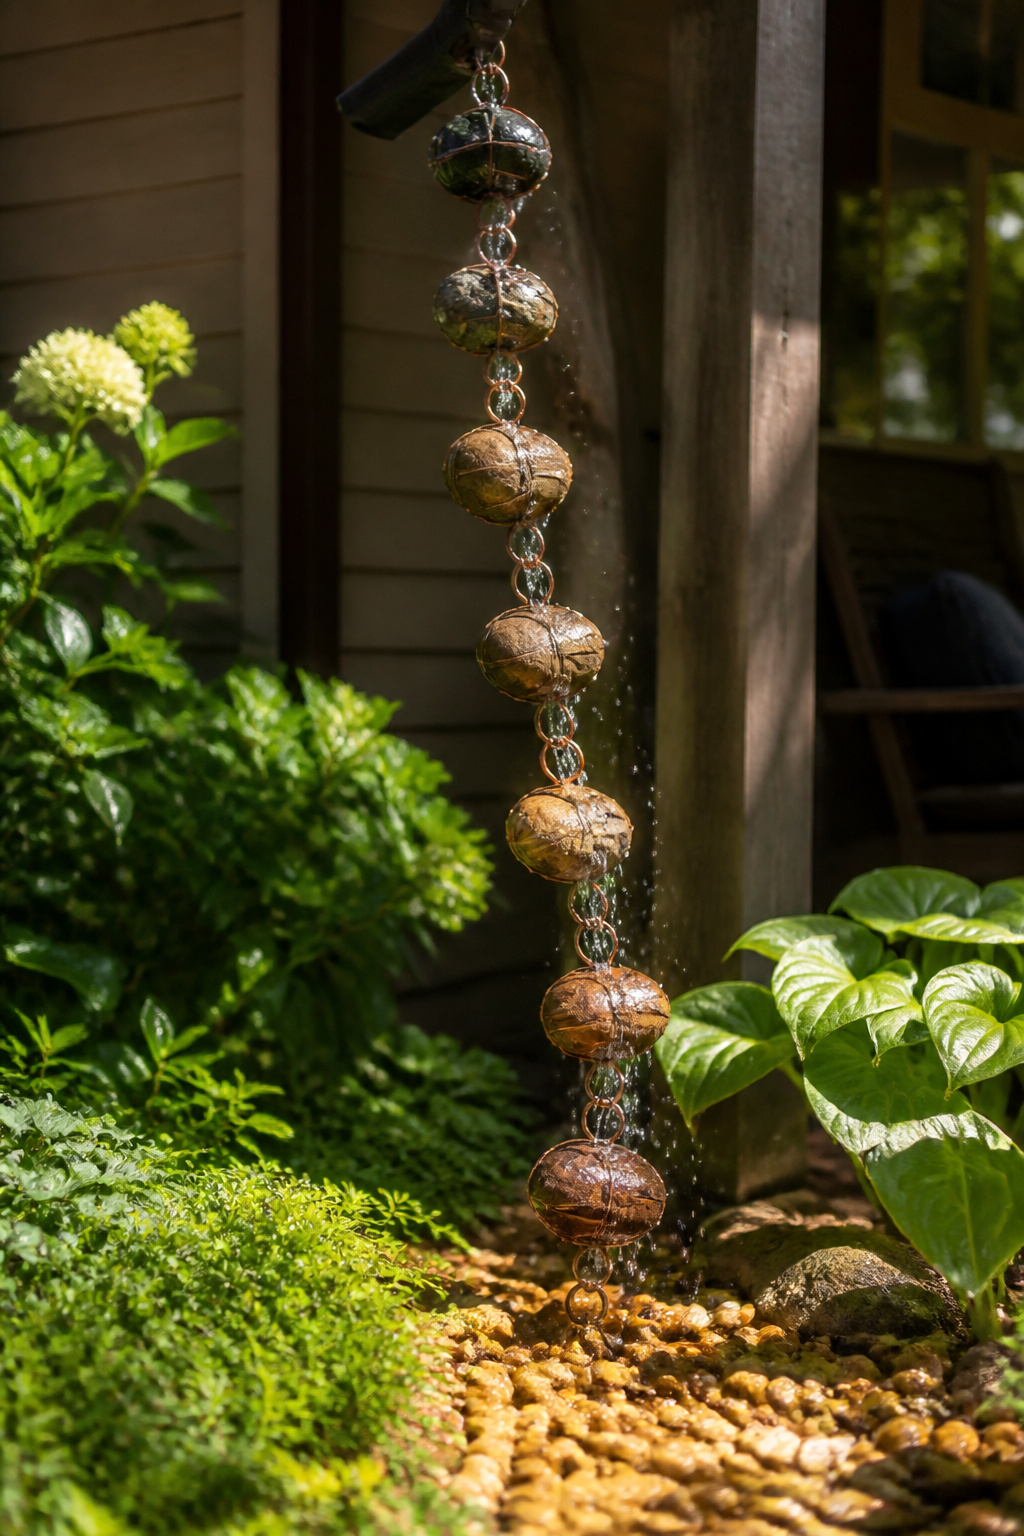
A river rock rain chain swaps cups for stones wrapped in craft wire, so water skims across solid surfaces instead of funneling through vessels. The sound changes completely: more splash than tinkle, closer to a creek over gravel than a dripping faucet.
Round river rocks or beach pebbles work best, each one caged in its own wire harness and linked to the next with wire loops. You will need wire cutters and needle-nosed pliers, plus patience for the wrapping. The weight is the surprise here. These chains run heavy, which keeps them steady in wind but means your gutter bracket had better be stout.
Colored sea glass or large glass beads can substitute for some stones if you want variation in light and color. Either way, the water follows the path of least resistance down each rock face, splitting and rejoining in a way cup chains do not duplicate. The visual effect is quieter than copper bells or terracotta pots, more geological than crafted.
Cost stays low if you collect your own stones. The wire is the only real purchase, and a single spool of craft wire outlasts several chains.
12. DIY Tart Tin Rain Chain

A tart tin rain chain is the kind of project that starts with a drawer full of mismatched bakeware and ends with something genuinely useful in the garden. Thread tart tins, yogurt pots, plastic cups, soda bottles, or whatever else has collected in the kitchen onto a length of sturdy wire, make a loop at the top for hanging, and you have a chain that carries water from the gutter down through a string of recycled objects. No rules beyond getting the runoff from the roof to the ground, which makes this about as forgiving as rain chains get.
The tins catch the water, spill it to the next one down, and the whole thing shimmers when it rains. Beads strung between pieces add weight and sound. Plastic cups hold more water than metal tins and empty with a louder knock. Soda bottles, cut and inverted, act like little funnels. The mix of materials is what gives the chain its character, and since everything came from the discard pile, a mistake costs nothing.
This is beginner territory. No soldering, no specialty fittings, no order to follow. The wire does the structural work; the objects just need to hang in the path of the water. Start with what you have, hang it from the roof corner, and adjust after the first rain.
13. Downspout Waterfall

A downspout waterfall needs more room than most rain chain endings, and more stone moving than you might expect from a casual weekend. Flat rocks and gravel stack beneath the chain’s end so water travels down in steps rather than punching one hole in the ground. The rocks spread that flow across a wider area, which slows the stream and lets it seep instead of eroding soil.
The sources split on how to build it. One approach calls for stacked flat rocks arranged as an attractive waterfall; another lays weed barrier fabric first, then pours decorative gravel on top for a simpler drainage point. Both work, but the stacked rock version is the one that reads as a landscape feature rather than a functional afterthought. Stone weight matters here, enough that moving it by wheelbarrow is the practical limit for most gardeners working alone.
This is not a balcony project. You need ground space and enough drop from the gutter to let water fall in visible stages. If your downspout ends less than a few feet above grade, the waterfall effect falls flat, literally.
14. Run-Off Pond

A rain chain emptying into a pond turns runoff into something you actually want to watch. The chain carries water from the gutter down to the surface, and the pond holds it long enough to matter. Whether the pond keeps its level on its own depends on your rainfall and your roof area. A small roof in a wet climate might keep a pond topped off through most seasons; a large roof in dry weeks will dump hard and fast, then leave the water low for days.
The real work is overflow. That same roof that feeds the pond can overwhelm it in a single storm. An overflow drain set near the top edge, sloped away from the house, keeps the basin from becoming a flood. The sources suggest a waterproof membrane under any stone lining, which also means the pond is not naturally fed from below. It is a contained system, and contained systems need watching. In heavy rain some splashing from the chain is normal, more than a closed downspout would allow, so the pond edge should sit low enough to catch what spreads rather than letting it seep toward the foundation.
A naturally fed pond, fed by groundwater or a spring, is a different creature entirely. Adding roof runoff to one risks overwhelming it with volume it never evolved to handle. For a constructed pond, the rain chain is a supplement, sometimes the main supply, and the balance between input and outflow is the part you manage by hand.
15. Funnel and Measuring Cup Rain Chain

Graduated funnels and nested measuring cups turn an ordinary rain chain into something that actually tells you how much water is moving through it. The smallest cup at the bottom catches a thin trickle and overflows quickly, while the wide mouth of a funnel higher up accepts a heavy downpour without splashing past. Watching the water climb from one size to the next gives a clear visual signal of intensity that a standard chain simply does not provide.
Thrifted aluminum measuring cups from a restaurant supply store hold up better than the thin stamped ones sold for home kitchens. The handles need to be drilled or the rims wired so each cup hangs level, not tilted; water has to hit the center and funnel straight down or the chain loses its neat cascade. A 1/4-cup measure at the bottom and a 2-cup measure near the top brackets the range most downspouts see in a moderate rain.
The sound changes with the volume too, which is part of the appeal. A light shower produces a thin ringing against metal, while a heavier flow deepens to something closer to a brook. That variation makes this style worth considering for a patio or covered porch where you actually sit and listen.
16. Sculptural Accents

A rain chain that reads as sculpture even in dry weeks starts with material choice. Copper tubing develops a patina over time, shifting from bright metal to something that looks pulled from an older garden, and that surface change carries visual weight long after the water stops flowing.
Placement matters more than design. One architect ran a chain down a projecting upper-level roof where the wall needed depth, turning drainage into a deliberate architectural gesture rather than an afterthought. The chain became a vertical line the eye follows even on cloudless days.
For a smaller yard, the same principle scales down. A line of cups hung in sequence reads as rhythm and repetition, something you might see in a gallery courtyard. Combine that with a trellis or pergola post and the chain stops looking like plumbing and starts reading as a joint between built and planted space.
The patina is part of the piece, not a problem to solve. New copper looks manufactured; weathered copper looks collected. If you want immediate age, soft copper tubing takes solder and hand-forming, though that asks for more tool comfort than most weekend projects allow.
Hang multiples in a row if the architecture supports it, or guide the lowest cup into a small basin or custom fountain so the chain terminates with purpose. The water path becomes a closed composition whether it is running or still.
Installation and Drainage Planning
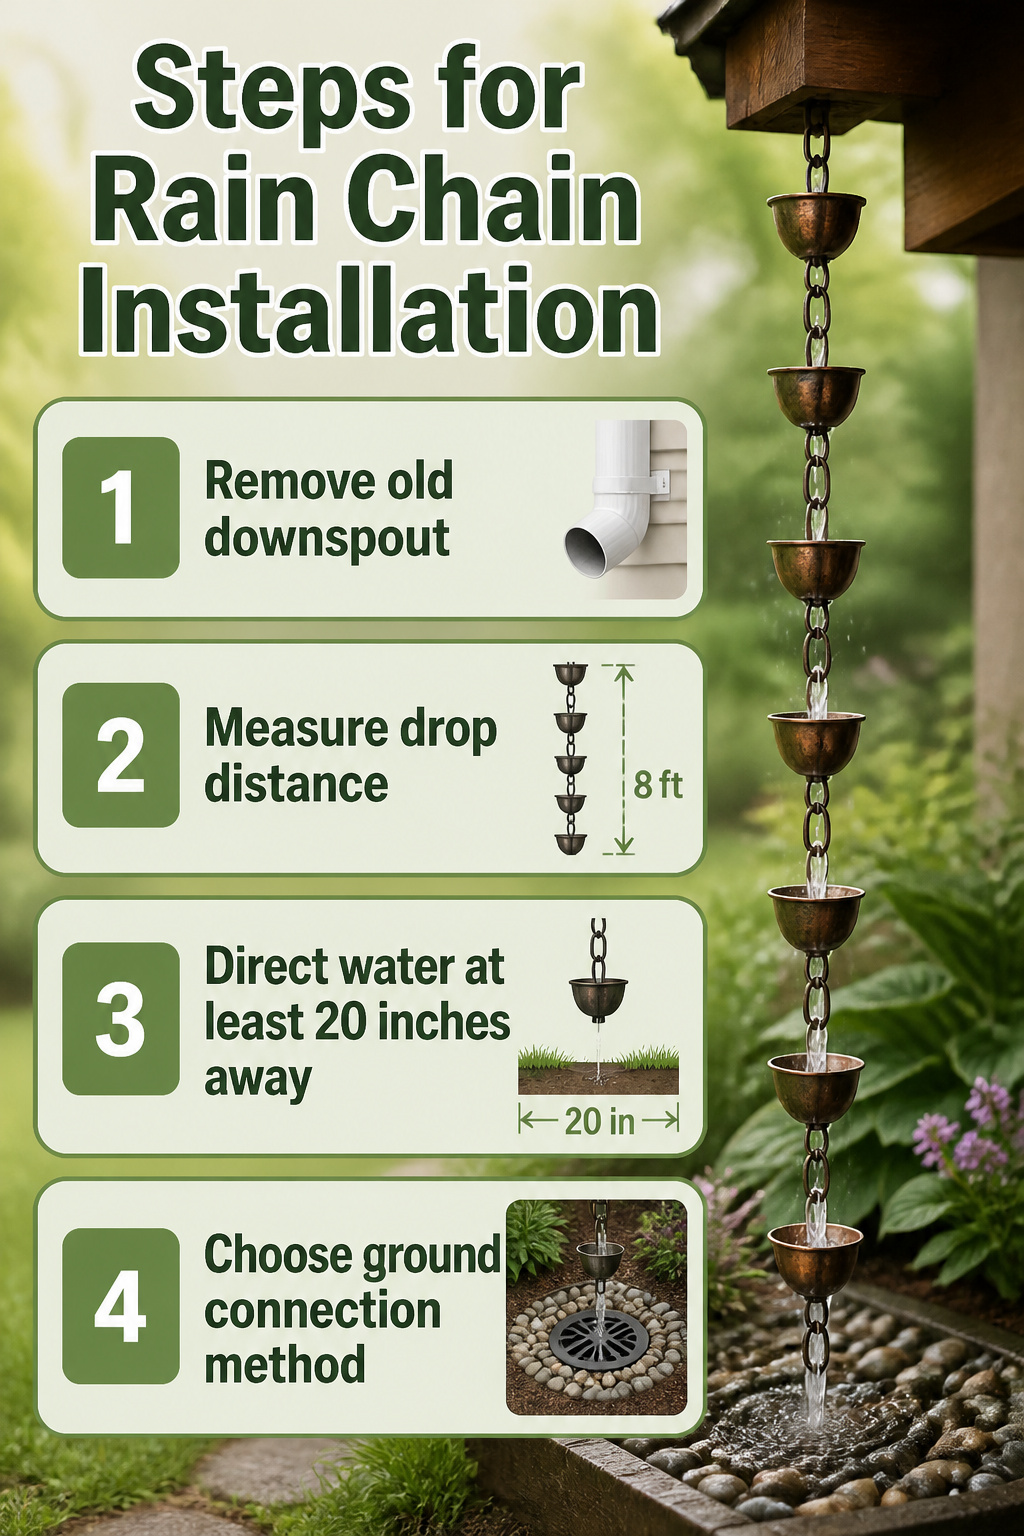
A rain chain replaces your downspout entirely, so the first move is pulling the old spout and planning where the water lands. Most chains run about eight feet from gutter to ground, which covers a standard single-story eave, but measuring your own drop matters. The bottom cup or link should hang free, not rest in mud or against siding.
Where that water hits is what determines whether this project helps or harms your house. Direct the runoff at least 20 inches from your foundation, farther if your soil drains slowly. In a heavy storm, a chain simply cannot move water as fast as a closed downspout. Water splashes, sheet-flows off cups, and can pool exactly where you do not want it.
Your ground connection options fall into three broad approaches. A gravel bed with a buried drainage pipe handles the most volume and still looks tidy. A direct connection to a drain grate keeps things neat but needs existing yard drainage to tie into. The simplest route is a gravel bed sized for ground infiltration, which lets the water sink back into the soil slowly and feeds any planting nearby. Each choice depends on your rainfall, your soil, and whether the chain hangs by your front door or over a garden bed where a little oversplash does not matter.
Materials That Last
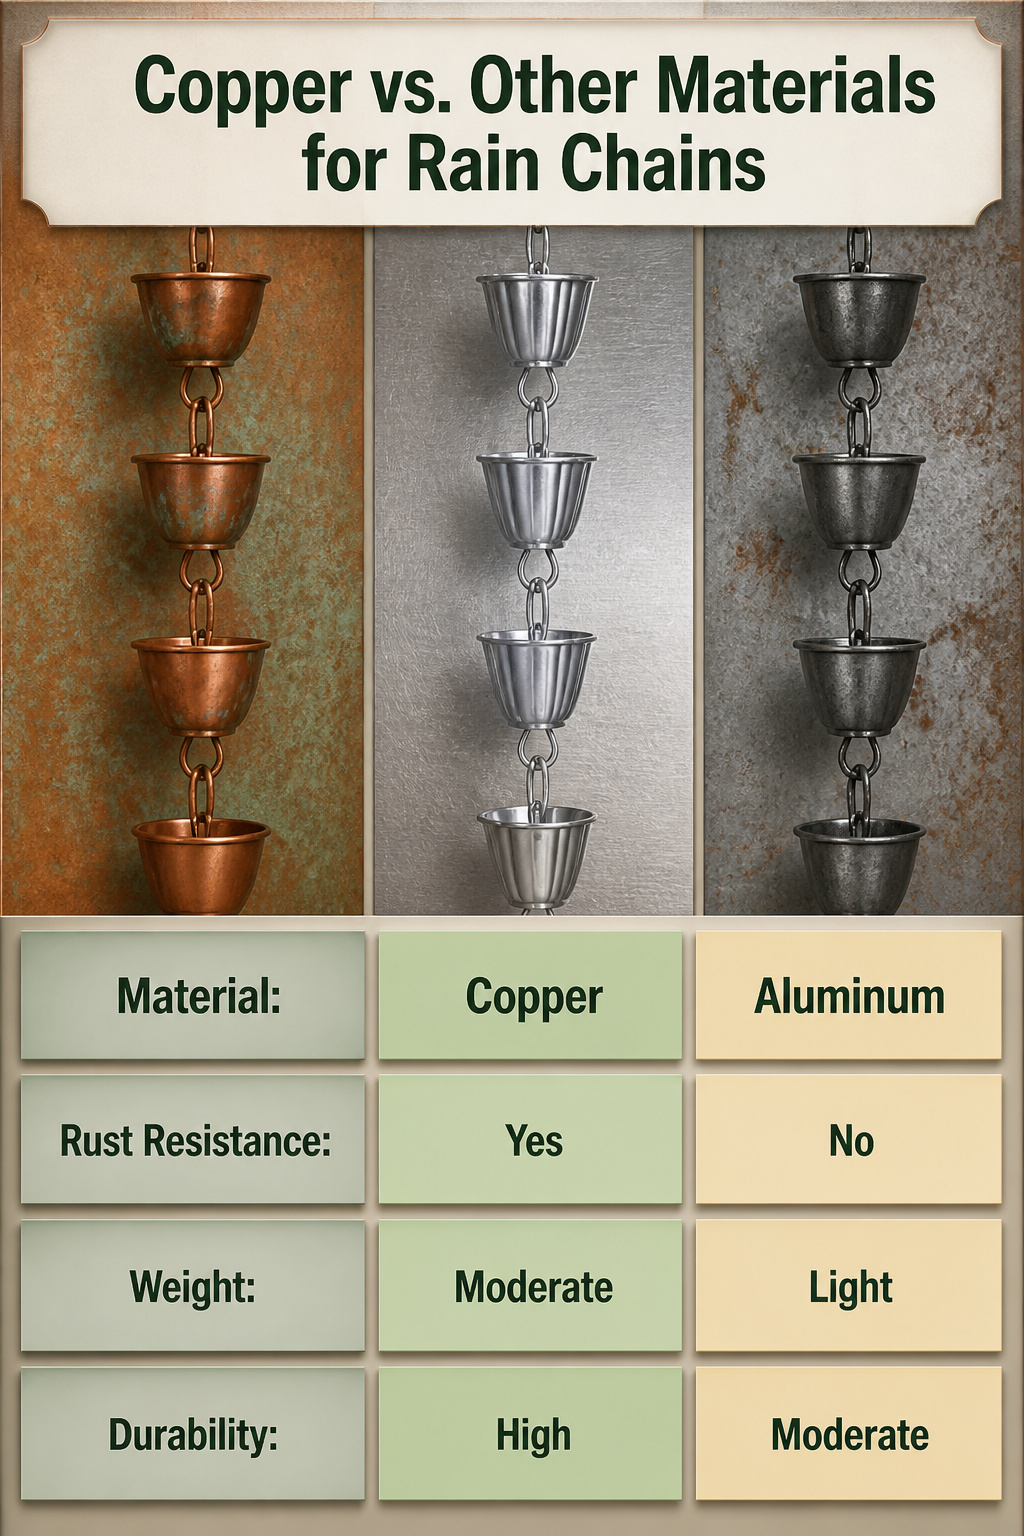
Copper sits at the top of most rain chain lists for a reason that matters after year three, not day one. It does not rust, and the patina it develops, that mottled green-brown film, only looks better against siding or stone as it ages. A copper chain of cups will read as sculpture long before the rain starts falling.
Other metals hold up fine but behave differently. Aluminum stays bright and light, which helps if you are hanging a long drop and worrying about gutter load. Steel wants a coating; bare, it will orange-stain whatever it drips on. Galvanized finishes buy you time, though scratched spots eventually surrender.
The real outliers are the repurposed pieces. A rain chain built from old spoons, forks bent at the tines to link together, or measuring cups nested along a line, trades factory uniformity for something that reads as found object. These work best when the material is already weatherproof. Silverplate will tarnish, but it will not dissolve. Terracotta, by contrast, cracks in hard freezes unless you have a dry winter plan.
Weight is the practical check. Copper tubing rings or solid cups move in wind without tangling; a chain of hollow baubles or thin tin can kink or clatter itself apart. Choose by what your gutter bracket can carry through an ice storm, because that load arrives whether you planned for it or not.
Maintenance Reality
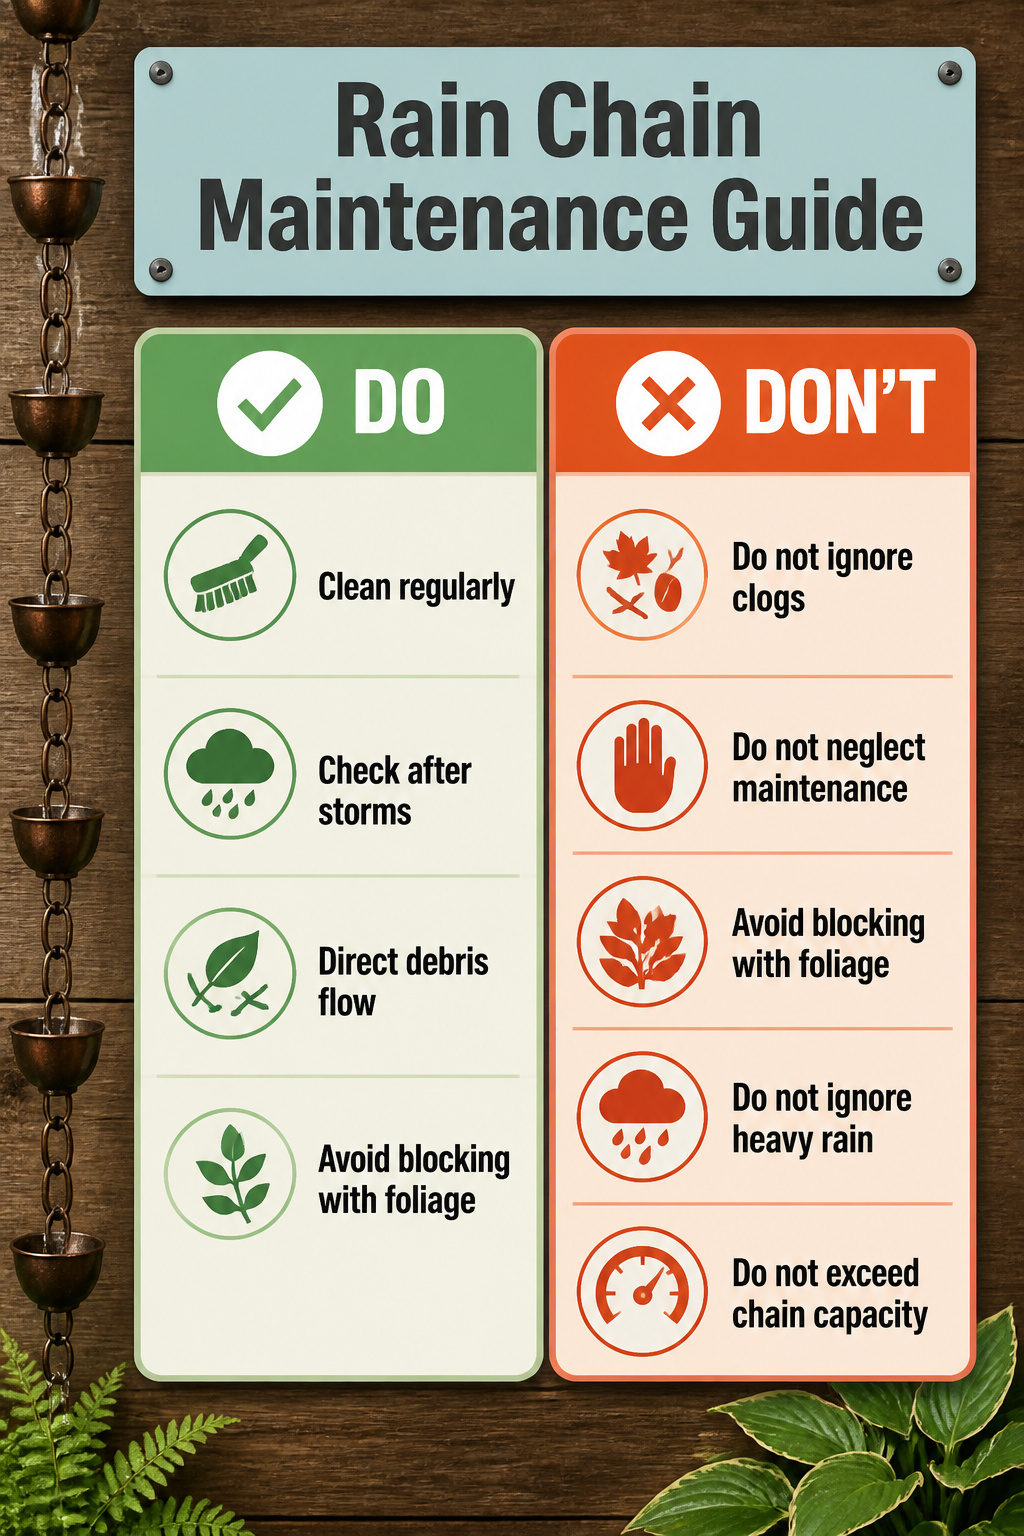
Rain chains collect debris the way a bare gutter does, except the chain has no cover and every link is a catch point. Leaves, twigs, and grit lodge between the cups or rings, and once water starts backing up the splash pattern turns unpredictable. Cleaning mine meant working a stiff brush down the full length every few weeks through autumn, more often under the maple that overhangs the roof. A traditional downspout asks for a scoop and hose maybe twice a year; the chain wanted attention like a fountain.
Heavy foliage makes the gap worse. Sources note that chains simply work better with slower rain, and one homeowner with a sedum roof described how that buffer slowed the runoff enough to keep the chain behaving. Without that buffer, or without the discipline to clear the chain after every storm, you are managing a clog-prone open channel in exactly the weather that punishes clogs hardest.
"Rain chains are designed to guide water in a controlled way, but in intense storms, the sheer volume of rain can overwhelm the chain, causing water to splash outside its intended path"
What this means in practice: the maintenance is not occasional, it is seasonal at minimum, and the chain belongs where you can reach it with a ladder and ten minutes to spare.
Frequently Asked Questions
What are the most effective DIY rain chain drainage ideas for beginners?
A gravel bed right below the weighted end of the chain is the simplest and most effective setup. Lay weed barrier fabric on the ground, pour decorative gravel on top, and you have a natural drainage point that cuts down on splashing and mud. No special tools or plumbing are needed, and it works with any chain style.
What should you put at the bottom of a rain chain?
Common choices include a basin, decorative pot, or rain barrel to collect water, or a layer of river rocks, gravel, or a splash block to manage drainage and prevent erosion. A gravel bed with a buried pipe handles the most volume, while a direct connection to a drain grate keeps installation minimal. The right pick depends on how much rain you get and how visible the spot is.
Do rain chains work as well as downspouts?
For everyday rainfall, a rain chain moves water down just as effectively as a traditional downspout. In a heavy storm, some splashing happens that a closed pipe would contain, so larger roofs often pair a functional downspout for main runoff with a rain chain at the front entry or another spot where appearance matters.
What is the downside to a rain chain?
Rain chains are not as efficient as enclosed downspouts during heavy rainfall, and the volume can overwhelm the chain, sending water outside its intended path. They also collect leaves and debris that need regular clearing, and the open design means water splashes and sheet-flows rather than staying contained.